

Every time you open a website, send an email, or use an app on your Android phone, your device performs a DNS lookup. Think of DNS as the internet's phone book — it translates human-readable addresses like revivatech.co.uk into the numerical IP addresses that computers actually use to communicate.
The problem? By default, these lookups happen in plain text. That means your mobile carrier, the coffee shop Wi-Fi operator, or anyone else positioned between your phone and the internet can see exactly which websites and services you're accessing. They can't see what you're doing on those sites (that's what HTTPS handles), but the list of domains you visit paints a remarkably detailed picture of your online life.
What Private DNS Actually Does
Private DNS — technically called DNS-over-TLS (DoT) — wraps your DNS queries inside the same type of encryption that protects your online banking. Instead of broadcasting your browsing destinations in cleartext, your phone creates a secure tunnel to a trusted DNS resolver and sends all lookups through that protected connection.
This delivers three key benefits:
- Prevents snooping: Your ISP, network administrator, or anyone eavesdropping on public Wi-Fi can no longer see which domains you're visiting
- Blocks tampering: Attackers can't redirect your DNS queries to malicious servers (a technique known as DNS hijacking)
- Reduces tracking: Your browsing patterns can't be harvested and sold by ISPs or Wi-Fi providers
Setting Up Private DNS on Android 9 and Later
Google built Private DNS support directly into Android starting with version 9 (Pie), released in 2018. If your phone runs Android 9 or newer — which covers the vast majority of actively used Android devices — you already have this feature available.
Here's how to enable it:
Step 1: Open Your Network Settings
Navigate to Settings on your Android device. The exact path varies slightly depending on your phone manufacturer:
- Stock Android / Pixel: Settings → Network & Internet → Private DNS
- Samsung Galaxy: Settings → Connections → More Connection Settings → Private DNS
- OnePlus / Oppo: Settings → Wi-Fi & Network → Private DNS
- Xiaomi / Redmi: Settings → Connection & Sharing → Private DNS
Step 2: Select Your DNS Provider
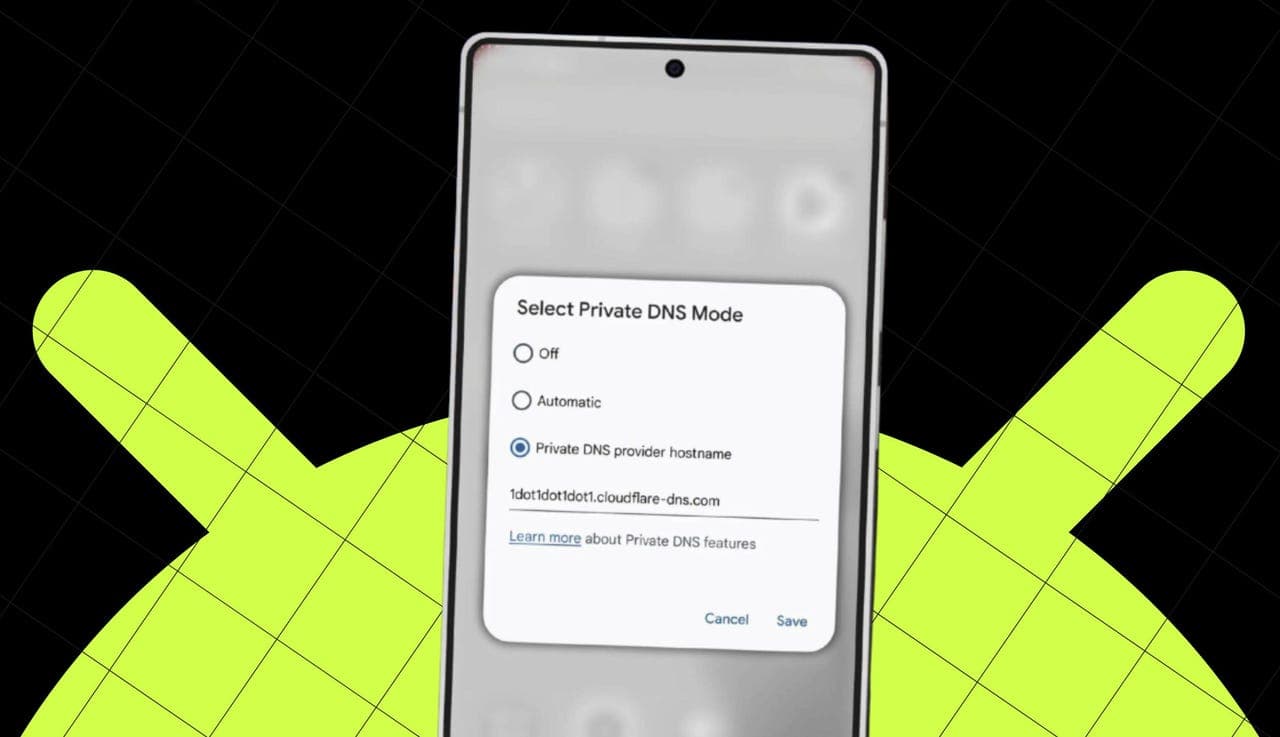
You'll see three options:
- Off: Disables encrypted DNS entirely (not recommended)
- Automatic: Uses your current network's DNS server with encryption if available, falls back to unencrypted if not
- Private DNS provider hostname: Lets you specify a particular encrypted DNS service
Step 3: Enter Your Chosen DNS Hostname
Type the hostname of your preferred DNS provider. Here are the most popular and verified options:
1dot1dot1dot1.cloudflare-dns.com— Cloudflare DNS (fast, privacy-focused)dns.google— Google Public DNS (reliable, widely used)dns.quad9.net— Quad9 (blocks known malicious domains)dns.adguard-dns.com— AdGuard DNS (blocks ads and trackers)
https:// or tls:// before it. Android handles the protocol automatically.
Tap Save, and you're done. Your phone will immediately begin encrypting all DNS queries through your chosen provider.
Which DNS Provider Should You Choose?
All four providers listed above are reputable and free. The best choice depends on your priorities:
Cloudflare (1dot1dot1dot1.cloudflare-dns.com)
Cloudflare consistently ranks as the fastest public DNS resolver in independent benchmarks. They've committed to never selling user data and purge all DNS query logs within 24 hours. Their service undergoes regular third-party privacy audits by KPMG. If raw speed is your priority, this is the top choice.
Google Public DNS (dns.google)
Google's DNS service is extremely reliable with data centres worldwide. They retain anonymised query data for diagnostic purposes. If you already use Google services extensively, you're not giving up additional privacy by using their DNS.
Quad9 (dns.quad9.net)
Quad9 is operated by a Swiss non-profit foundation, which gives it strong legal privacy protections under Swiss law. Its standout feature is built-in malware protection — it automatically blocks DNS queries to known malicious domains. This adds a layer of security beyond just encryption, making it an excellent choice for less tech-savvy users or families.
AdGuard DNS (dns.adguard-dns.com)
AdGuard DNS blocks advertising and tracking domains at the DNS level, which means fewer ads and trackers across all apps on your phone — not just your web browser. This can also slightly improve battery life and reduce mobile data usage since ads never load in the first place. The trade-off is that some websites may behave unexpectedly if they rely heavily on ad-supported functionality.
Verifying Your Private DNS Is Working
After enabling Private DNS, you should verify it's actually active. There are two easy ways to check:
Method 1: Visit 1.1.1.1/help in your phone's browser (if using Cloudflare) or dns.google (if using Google). These pages will confirm whether your DNS queries are encrypted.
Method 2: Look for the lock icon or "Private DNS" indicator in your network settings. If the hostname you entered is accepted and saved without errors, your encrypted DNS is active.
If you see a "Couldn't connect" error after entering a hostname, double-check the spelling. The most common mistakes are adding "https://" before the hostname or using incorrect formatting. Remember, for Cloudflare it's 1dot1dot1dot1.cloudflare-dns.com — with the word "dot" spelled out, not actual dots.
Private DNS on Older Android Versions
If your phone runs Android 8 (Oreo) or earlier, you won't find the Private DNS setting in your system preferences. However, you can still achieve encrypted DNS by installing a third-party app like:
- Cloudflare 1.1.1.1 app — Creates a local VPN connection to route your DNS through Cloudflare's encrypted service
- NextDNS app — Offers customisable DNS filtering with encryption
- Intra by Jigsaw (Google) — Lightweight app specifically designed for DNS-over-HTTPS on older Android versions
That said, if your phone is still running Android 8 or older, it's likely no longer receiving security updates. At that point, unencrypted DNS is the least of your security concerns, and you should seriously consider upgrading to a newer device.
Does Private DNS Affect Performance?
A common concern is whether encrypting DNS queries will slow down your internet connection. In practice, the impact is negligible. DNS lookups typically take 10-50 milliseconds, and the encryption overhead adds perhaps 5-10 milliseconds to each query. You won't notice this in normal browsing.
In fact, switching to a well-maintained public DNS provider like Cloudflare or Google often improves your DNS resolution speed compared to your ISP's default DNS servers, which may be slower or less reliable. Many users report noticeably faster page loading after switching, particularly on mobile networks.
Final Thoughts
Enabling Private DNS is one of the simplest and most effective security improvements you can make on your Android phone. It takes less than a minute to set up, costs nothing, has virtually no performance impact, and immediately encrypts a significant portion of your network metadata.
In an era where our phones contain our most sensitive information — banking, health data, personal messages — taking basic steps to protect our network traffic isn't just sensible, it's essential. Private DNS won't make your phone impervious to all threats, but it closes a significant gap that most people don't even know exists.
If you're concerned about your device's overall security posture, or if you're experiencing network-related issues after enabling Private DNS, our team at RevivaTech can help. We offer comprehensive device security checks and network troubleshooting as part of our repair and maintenance services.
Share this article
Written by
RevivaTech Team
Expert technicians and security enthusiasts at RevivaTech, helping you get the most out of your devices while keeping them safe and secure.